Stop Giving Your DNS History to Strangers: Pi-hole and Unbound on Your Home Network
Every time you open a browser, launch an app, or turn on a smart TV, your device makes a DNS query, translating a domain name into an IP address. By default, those queries go to your ISP, or to a public resolver like Google (8.8.8.8) or Cloudflare (1.1.1.1). That means someone outside your home sees a complete log of every domain every device on your network resolves, all day, every day.
This guide walks through setting up Pi-hole and Unbound on your home network. Pi-hole filters DNS queries against blocklists of known advertising, tracking, and malware domains. Unbound resolves everything else by querying the DNS hierarchy directly - no third-party middleman. The result is network-wide ad blocking and a DNS resolution path that doesn't hand your complete query history to any single outside entity.
You don't need a specific firewall or router to do this. Pi-hole and Unbound run on a Raspberry Pi or any spare Linux box, and they work with whatever network equipment you already have.
What You'll Need
Hardware (any one of these):
- Raspberry Pi 4 (2GB+ RAM) - low power, dedicated, ideal
- Any Linux machine, virtual machine, or Docker host on your network
- An old laptop you're not using for anything else
Network access:
- The ability to change your router's DHCP settings (specifically, the DNS server it hands out to clients)
- A static IP address on your LAN for the Pi-hole host
Time: About an hour for the full setup, including Unbound.
Part 1: Installing Pi-hole
Assign a Static IP
Your Pi-hole host needs a static IP so every device on your network can find it reliably. You can reserve an IP in your router's DHCP settings, or set one directly on the host.
On Raspberry Pi OS or Debian:
sudo nano /etc/dhcpcd.conf
Add (adjust the IP and gateway to match your network):
interface eth0
static ip_address=192.168.1.2/24
static routers=192.168.1.1
static domain_name_servers=127.0.0.1
sudo systemctl restart dhcpcd
If your LAN uses a different subnet (like 10.0.0.x or 172.16.x.x), adjust accordingly. The specific IPs don't matter. What matters is that the Pi-hole host's address doesn't change.
Run the Installer
curl -sSL https://install.pi-hole.net | bash
If you'd rather review the script before piping it to bash (reasonable), download it first and read through it.
The installer will ask you a few questions:
- Upstream DNS provider: Pick anything for now. You're going to replace this with Unbound shortly.
- Blocklists: Accept the default Steven Black unified list. You'll add more later.
- Web admin interface: Yes. You'll want the dashboard.
- Query logging: Enable it. Visibility into what's happening on your network is the whole point.
When it finishes, the installer prints your admin panel password. Save it, then change it immediately:
pihole -a -p
Verify It's Running
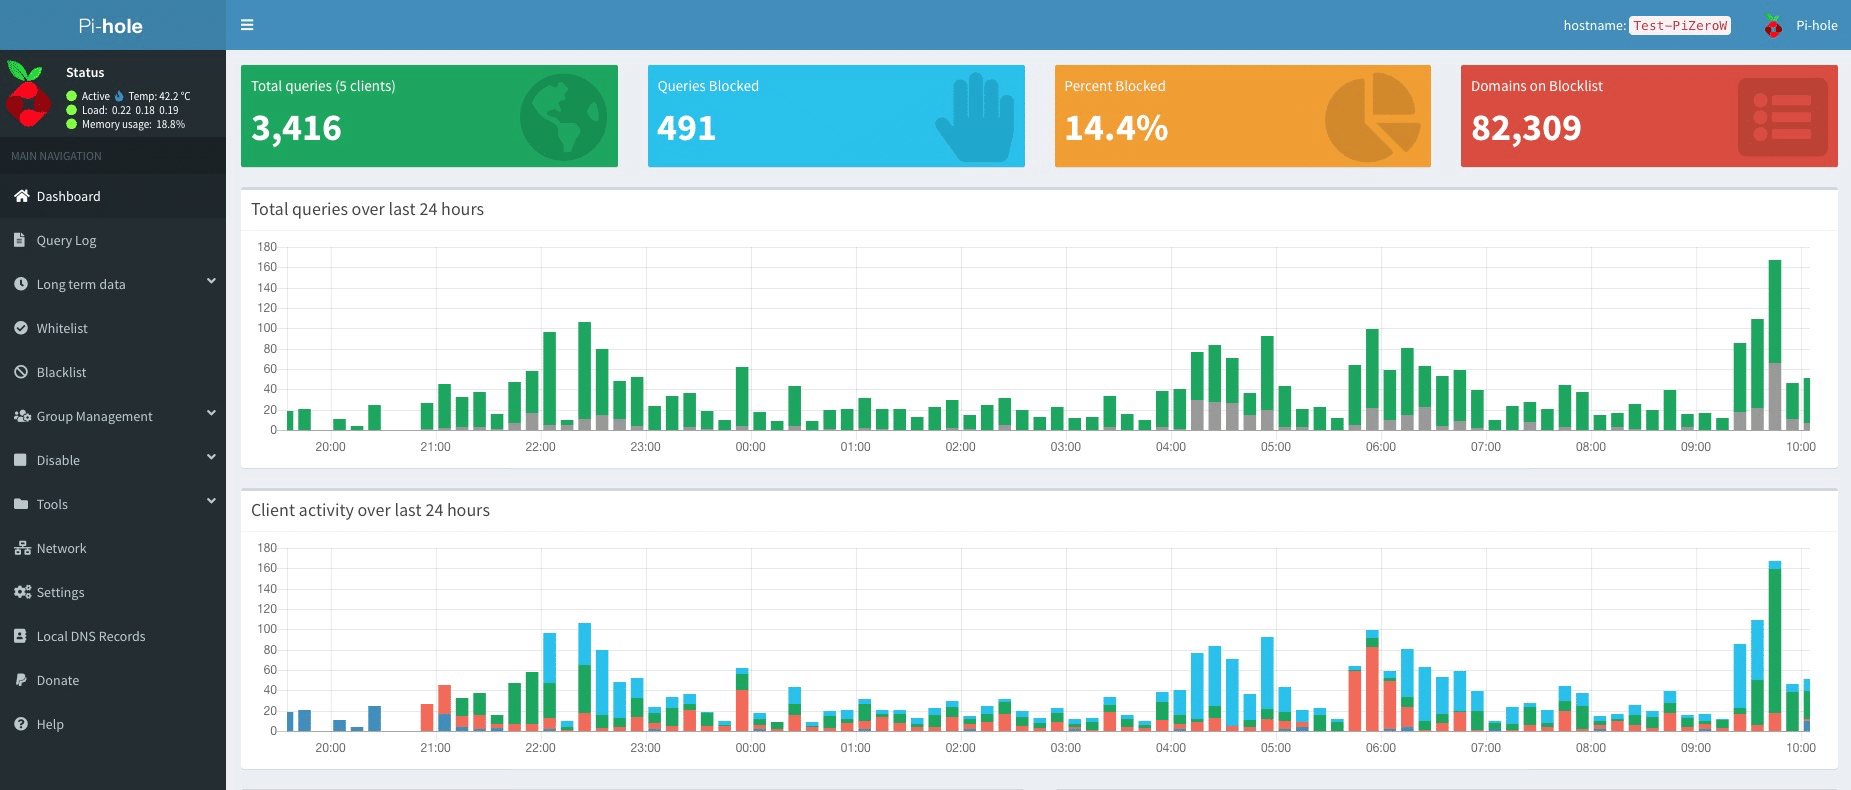
Open a browser and navigate to http://<your-pihole-ip>/admin. You should see the Pi-hole dashboard. It won't have much data yet - that's fine.
Part 2: Configuring Blocklists
The default blocklist catches basic advertising domains. For broader coverage, add a few more.
In the admin panel, go to Settings → Adlists and add these URLs:
| List | What It Blocks |
|---|---|
https://raw.githubusercontent.com/StevenBlack/hosts/master/hosts |
Ads + malware (unified) |
https://raw.githubusercontent.com/hagezi/dns-blocklists/main/adblock/pro.txt |
Comprehensive tracker and ad blocking |
https://big.oisd.nl/ |
Curated list with low false positives |
https://malware-filter.gitlab.io/malware-filter/urlhaus-filter-hosts.txt |
Known malware domains |
After adding them, update the blocklists:
pihole -g
A word of caution: more lists is not always better. Aggressive blocklists cause false positives - legitimate services break because a domain they depend on is blocked. Start with these four, use your network normally for a week, and watch the query log for anything that breaks.
Whitelisting Essentials
Some domains will need to be explicitly allowed. These are the ones that most commonly cause problems when blocked:
# Microsoft services (login, Office 365)
pihole -w login.microsoftonline.com
pihole -w outlook.office365.com

# Apple services
pihole -w gateway.icloud.com
pihole -w apple.com

# Captive portal detection (WiFi login pages at hotels, airports)
pihole -w connectivitycheck.gstatic.com
pihole -w captive.apple.com
When something breaks, the troubleshooting process is always the same: open the query log (pihole -t in the terminal, or Query Log in the admin panel), reproduce the problem, find the blocked domain, and whitelist it.
Part 3: Installing Unbound
Pi-hole is now filtering DNS. But it still needs to send every non-blocked query somewhere to be resolved. Right now, that somewhere is whatever upstream DNS provider you selected during installation (likely Cloudflare, Google, or Quad9).
The problem: that provider sees every domain your network resolves. They all have privacy policies promising they don't log or sell that data, but you're trusting a promise from a company you don't control.
Unbound changes the model entirely. Instead of forwarding queries to a third party, it resolves them recursively, walking the DNS hierarchy from the root servers, to the TLD servers, to the authoritative nameserver for each domain. No single external server sees your full query history.
The Before and After
Before (forwarding):
Your device → Pi-hole → Cloudflare (1.1.1.1) → Answer
Cloudflare sees every query.
After (recursive):
Your device → Pi-hole → Unbound → Root → .com TLD → example.com auth → Answer
The .com TLD server sees you asked about example.com, but it doesn't see any of your other queries. The example.com nameserver sees that one query but nothing else. No single party has the full picture.
Install
On the same host as Pi-hole:
sudo apt install unbound
Download Root Hints
Unbound needs to know the IP addresses of the 13 DNS root servers:
sudo wget -O /var/lib/unbound/root.hints \
  https://www.internic.net/domain/named.root
These change rarely, but set up a monthly cron job to keep them current:
sudo crontab -e
Add:
0 3 1 * * wget -q -O /var/lib/unbound/root.hints https://www.internic.net/domain/named.root && systemctl restart unbound
Configure
Create the configuration file:
sudo nano /etc/unbound/unbound.conf.d/pi-hole.conf
server:
    # Listen only on localhost — Pi-hole is the only client
    interface: 127.0.0.1
    port: 5335
    do-ip4: yes
    do-ip6: no
    do-udp: yes
    do-tcp: yes

    # Only allow queries from localhost
    access-control: 127.0.0.0/8 allow
    access-control: 0.0.0.0/0 refuse

    root-hints: "/var/lib/unbound/root.hints"

    # Security
    hide-identity: yes
    hide-version: yes
    harden-glue: yes
    harden-dnssec-stripped: yes
    harden-referral-path: yes
    harden-algo-downgrade: yes
    use-caps-for-id: yes

    # DNSSEC — verify responses are authentic
    auto-trust-anchor-file: "/var/lib/unbound/root.key"
    val-clean-additional: yes

    # Privacy — send only what each server needs to know
    qname-minimisation: yes
    aggressive-nsec: yes

    # Performance
    num-threads: 2
    msg-cache-slabs: 4
    rrset-cache-slabs: 4
    infra-cache-slabs: 4
    key-cache-slabs: 4
    msg-cache-size: 64m
    rrset-cache-size: 128m
    cache-min-ttl: 300
    cache-max-ttl: 86400
    prefetch: yes
    prefetch-key: yes

    # Logging — keep it minimal
    verbosity: 0
    log-queries: no
    log-replies: no
    log-servfail: yes

    # Block upstream responses containing private IPs (anti-rebinding)
    private-address: 10.0.0.0/8
    private-address: 172.16.0.0/12
    private-address: 192.168.0.0/16
    private-address: 169.254.0.0/16
    private-address: fd00::/8
    private-address: fe80::/10
A few of the key settings worth understanding:
qname-minimisation — Without this, Unbound sends the full domain name to every server in the chain, including root and TLD servers that don't need it. With it enabled, the root server is only asked "who handles .com?", the TLD is asked "who handles example.com?", and only the authoritative server gets the full query. This is a meaningful privacy improvement.
use-caps-for-id — A forgery resistance technique. Unbound randomizes the capitalization of the query (eXaMpLe.CoM) and checks that the response preserves it. Legitimate servers do; an attacker trying to spoof a response is unlikely to guess the exact pattern.
DNSSEC validation (auto-trust-anchor-file) — Verifies that DNS responses are cryptographically signed by the domain's authoritative nameserver. If someone tampers with a response in transit, Unbound rejects it rather than passing a poisoned answer to Pi-hole.
Test It
# Check config syntax
sudo unbound-checkconf

# Start the service
sudo systemctl restart unbound

# Test a resolution
dig @127.0.0.1 -p 5335 example.com

# Verify DNSSEC works — this domain has an intentionally broken signature
dig @127.0.0.1 -p 5335 sigfail.verteiltesysteme.net
# Should return SERVFAIL (signature validation failed — correct behavior)

dig @127.0.0.1 -p 5335 sigok.verteiltesysteme.net
# Should return NOERROR (valid signature)
Part 4: Connecting Pi-hole to Unbound
Now point Pi-hole at the local Unbound instance instead of any external resolver.
In Pi-hole's admin panel, go to Settings → DNS:
- Uncheck every upstream DNS server — Cloudflare, Google, Quad9, all of them
- Under "Custom 1 (IPv4)," enter:
127.0.0.1#5335 - Save
That's it. Pi-hole now sends all non-blocked queries to Unbound on the same machine, and Unbound resolves them recursively without any third-party forwarder.
Verify the chain is working:
# Should resolve successfully
dig @127.0.0.1 example.com

# Watch queries in real time
pihole -t
Open a browser and visit a few sites. In Pi-hole's dashboard, the upstream should now show localhost#5335 - not any external IP.
Part 5: Pointing Your Network at Pi-hole
The final step is making every device on your network use Pi-hole for DNS. There are two approaches.
Option A: Change Your Router's DHCP Settings (Recommended)
Log into your router's admin panel and find the DHCP settings. Change the DNS server field from your ISP's DNS (or whatever it currently is) to the static IP of your Pi-hole host.
On most consumer routers, this is under LAN Settings, DHCP Settings, or Network Settings. The field is usually labeled "DNS Server" or "Primary DNS."
After saving, devices will pick up the new DNS server the next time they renew their DHCP lease. You can force it by disconnecting and reconnecting WiFi, or by rebooting the device.
Option B: Use Pi-hole's Built-In DHCP
If your router doesn't let you change the DNS server in DHCP (some ISP-provided routers lock this down), you can disable DHCP on the router and enable it on Pi-hole instead. In the Pi-hole admin panel: Settings → DHCP → Enable DHCP server. Set the range, gateway (your router's IP), and save.
This works but adds a dependency: if Pi-hole goes down, devices can't get IP addresses at all, not just DNS.
Preventing Bypass
Some devices ignore the DNS server provided by DHCP and use their own hardcoded DNS. Google Chromecast and Android phones use 8.8.8.8. Amazon Echo devices have their own DNS path. Roku devices do the same.
If your router supports firewall rules, you can block outbound DNS (port 53) and DNS-over-TLS (port 853) to any destination except your Pi-hole. This forces even hardcoded devices to fail over or stop bypassing. The specific steps depend on your router; on consumer firmware, this is often under "Access Control" or "Firewall Rules." If your router doesn't support this, it's one of the stronger arguments for upgrading to something like OPNsense or OpenWrt.
Monitoring and Ongoing Maintenance
The Dashboard
Pi-hole's admin dashboard is genuinely useful. Check it periodically:
- Queries blocked (%) — Typical home networks see 15–30% of all queries blocked. If it's near zero, something isn't working. If it's above 50%, you probably have an overly aggressive blocklist.
- Top blocked domains — Shows you what's being caught. Expect to see ad networks, telemetry endpoints, and tracker domains.
- Top clients — Shows which devices generate the most queries. Smart TVs and IoT devices are often shockingly chatty.
- Query log — Per-request detail with timestamps. This is where you troubleshoot when something breaks.
Useful Commands
# Watch DNS queries in real time
pihole -t

# Update blocklists
pihole -g

# Temporarily disable blocking (5 minutes)
pihole disable 5m

# Console dashboard
pihole -c

# Update Pi-hole itself
pihole -up

# Update OS and Unbound
sudo apt update && sudo apt upgrade -y

# Check Unbound cache hit ratio
sudo unbound-control stats_noreset | grep total.num.cache
Cache Performance
Unbound caches resolved domains locally. After a few days of normal use, you should see a cache hit ratio of 60–80%+. First-time lookups for uncached domains will take 200–500ms (multiple round trips through the DNS hierarchy). Cached lookups should be under 5ms.
If you restart Unbound and want to avoid the slow cache-warming period, you can dump and reload the cache:
# Before restart
sudo unbound-control dump_cache > /tmp/unbound_cache.bak

# After restart
sudo unbound-control load_cache < /tmp/unbound_cache.bak
Keeping Root Hints Updated
The monthly cron job from Part 3 handles this automatically. If you want to verify it's working:
ls -la /var/lib/unbound/root.hints
The modification date should be within the last month.
Hardening
These are worth doing once the basic setup is working:
Pi-hole:
- Change the admin password (you already did this, right?)
- Restrict admin panel access to your LAN. If you're using lighttpd (Pi-hole's default web server), bind it to your LAN interface only
- Enable HTTPS on the admin panel with a self-signed certificate
- Set a reasonable query log retention period under
Settings → Privacy. You probably don't need six months of DNS history - Enable unattended security updates on the host OS
Unbound:
- Confirm it's only listening on
127.0.0.1(the config above does this). Unbound should never be exposed to your network directly; Pi-hole is the front door - Verify DNSSEC is working with the test domains from Part 3
- Keep query logging disabled in production. Pi-hole already logs queries, you don't need Unbound duplicating that
Resilience:
- Back up your Pi-hole config regularly:
Settings → Teleporter → Export - Back up Unbound's config file separately:
sudo cp /etc/unbound/unbound.conf.d/pi-hole.conf ~/unbound-backup.conf - Consider what happens if Pi-hole goes down: your entire network loses DNS. Options include running a second Pi-hole instance, or keeping a known-good SD card image you can swap in quickly
Troubleshooting
A website or service stopped working after enabling Pi-hole: Run pihole -t in a terminal, reproduce the problem, and look for blocked queries in the output. The domain Pi-hole is blocking will appear in red. Whitelist it with pihole -w <domain> and try again. Don't disable Pi-hole entirely to troubleshoot - that tells you nothing about which domain was the problem.
DNS feels slow: First-time lookups through Unbound (200–500ms) are normal and expected. The recursive resolution requires multiple round trips. Cached lookups should be near-instant. If everything is slow including cached domains, check that Unbound is healthy:
dig @127.0.0.1 -p 5335 +stats example.com
# Look at "Query time" — cached should be <5ms
If Unbound is struggling, check the journal: sudo journalctl -u unbound -n 50
Unbound won't start:
sudo unbound-checkconf   # Check for config syntax errors
sudo journalctl -u unbound -n 50   # Check the logs
Pi-hole dashboard shows queries going to an external upstream (not Unbound): Double-check Settings → DNS. The only entry should be 127.0.0.1#5335. All other upstream servers should be unchecked. Verify Unbound is running:
sudo ss -tlnp | grep 5335
DNSSEC is rejecting a legitimate site: Some domains have misconfigured DNSSEC on their end. Test with dig @127.0.0.1 -p 5335 +dnssec <domain>. If DNSSEC is genuinely the issue (the domain works when you temporarily switch to a non-validating resolver), you can add a domain-specific override in Unbound's config, but this should be rare.
What You've Built
At the end of this guide, your network's DNS resolution works like this:
- A device on your network asks for
example.com - The query goes to Pi-hole, which checks it against your blocklists
- If it's a known ad/tracker/malware domain, Pi-hole returns a null response. The request never leaves your network
- If it's legitimate, Pi-hole passes the query to Unbound
- Unbound resolves it recursively, asking root servers, TLD servers, and authoritative nameservers directly
- The answer comes back through Pi-hole to your device
No ISP DNS logging your history. No Google or Cloudflare seeing every domain you visit. No ads or trackers on devices that don't support browser extensions. But you'll see exactly what every device on your network is doing.